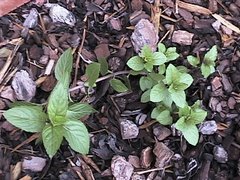
Well I went through a couple of days ago and cleaned up my herb garden a bit. I didn't have all that much to do really. Last year I started my garden with some Parsley, Cilantro, Oregano, Rosemary, Thyme, Basil, Mint and Lavender. I focused mainly on herbs that I buy fresh at the grocery store and threw in the Mint and Lavender for scent. Everything came back except the Basil and Cilantro. I knew the Basil would die since it is an annual and the Cilantro actually died last fall before our cold weather hit. I read that Cilantro will not do as well in the heat of the summer. It's supposed to do better in the Spring and Fall. Maybe that is what my problem was. It tends to get a bit hot in Oklahoma during the late summer. I also read that once the plant starts to flower or "bolt" that it becomes bitter and is no longer used as Cilantro. I guess at this point it becomes Coriander and can be harvested for the seeds. If you want to keep a steady supply of Cilantro, you have to keep planting it fairly often. Luckily I have some space where I can do this. We do love to make salsa and guacamole around my house! Anyway, I did plant some Cilantro seeds and I planted some chocolate mint that I purchased at a local nursery at the urging of both my daughters. They loved the smell! I figure that it will do very well in my garden. If it does as well as my other mint, it will be trying to take over! I found a couple of recipes using chocolate mint. I told the girls that we would have to give them a try. I have them posted below..........
Chocolatemint Chocolate Chip Cookies
Ingredients
2¼ cups flour
1 tsp baking soda
1 tsp salt
1 tbsp powdered chocolate mint (use coffee mill to grind dry herb)
½ cup butter (softened)
½ cup vegetable shortening
¾ cup sugar
¾ cup firmly packed brown sugar
1 tsp vanilla
Sift together the first four ingredients. In a large mixing bowl combine the remaining ingredients and beat till creamy. Beat in 2 eggs. Add the flour mixture and mix well. Stir in 2 cups (12 oz pkg) of semi-sweet chocolate bits and 1 cup of chopped walnuts (optional). Drop by rounded teaspoonfuls onto greased cookie sheets (or use parchment paper to line cookie sheets). Bake at 375°F for 8 to 10 minutes.
Chocolate Covered Mint Leaves
You will need 6 oz of semi-sweet chocolate morsels and freshly picked mint leaves which have been washed and patted dry. Melt the chocolate bits in the top of a double boiler. Dip each leaf in the chocolate and place on waxed paper to harden. Hardening occurs best by placing in the refrigerator.
Wednesday, May 2, 2007
Saturday, April 28, 2007
Planting our Vegetable Garden Finally!
We're supposed to have beautiful weather the whole weekend and I can't wait to take advantage of it. I got my run in early this morning and I'm getting ready to go into the backyard and plant our vegetable garden. My girls and I sowed some seeds early this year, but it didn't work out. Almost all of the seeds grew but our weather was just so cold and windy all the way past Easter that I waited too long to plant them outside and eventually some of them started to die. I planted the survivors last weekend, but the 30 mile an hour wind and subsequent downpour took everything except my watermelon plants. Oh well, I learned a couple of things. If I attempt to sow my own seeds next year, I need to invest in a grow light and take the time to transplant my seedlings to larger pods if I am unable to plant them outside due to weather conditions. Anyway, we went to the nursery yesterday and picked up a few pepper plants. I purchased two bell pepper, two serrano pepper and two hot cherry pepper plants. I am planting seeds directly for everything else. I have a very limited space so there won't be much to plant. We'll have some green beans, cucumbers, okra, yellow squash, zucchini squash, watermelon and of course the peppers. My husband worked in the compost a few weeks ago and I have my saved pine bark mulch from last year to put down once everything is planted. It will be interesting to see what grows. Last year the only thing that I planted direct from seed was okra, carrots, onions and jalapeno peppers. The okra and carrots did great. The onion and peppers, not so great. We'll see what happens.
I did learn a few things about peppers recently. They are self pollinators, but occasionally, they will cross pollinate from pollen carried by bees or other insects. To minimize this possibility, you are not supposed to plant hot and sweet peppers too close. They suggest that you separate them by 500 feet. I obviously don't have that much space and will be planting mine side by side. I don't have to worry about it affecting the fruit of this year's crop though. The cross will show up in the genetics of the seeds, if I save them. I won't be saving mine. Also, you should pick bell peppers when they get shiny, dark green and firm. When left on the plant, most peppers will turn red and are still good to eat. You should pick most hot peppers when they turn red or yellow, depending on the variety. Jalapenos are mature when the reach good size and become a deep, dark green. A fully mature jalapeno pepper, regardless of size, generally exhibits small cracks around the shoulders of the fruit. Lastly, by weight, green bell peppers are supposed to have twice as much vitamin C as citrus fruit; and red peppers are supposed to have three times as much. Hot peppers contain even more vitamin C, 357 percent more than an orange. Those are pretty good reasons to eat peppers, huh?
I did learn a few things about peppers recently. They are self pollinators, but occasionally, they will cross pollinate from pollen carried by bees or other insects. To minimize this possibility, you are not supposed to plant hot and sweet peppers too close. They suggest that you separate them by 500 feet. I obviously don't have that much space and will be planting mine side by side. I don't have to worry about it affecting the fruit of this year's crop though. The cross will show up in the genetics of the seeds, if I save them. I won't be saving mine. Also, you should pick bell peppers when they get shiny, dark green and firm. When left on the plant, most peppers will turn red and are still good to eat. You should pick most hot peppers when they turn red or yellow, depending on the variety. Jalapenos are mature when the reach good size and become a deep, dark green. A fully mature jalapeno pepper, regardless of size, generally exhibits small cracks around the shoulders of the fruit. Lastly, by weight, green bell peppers are supposed to have twice as much vitamin C as citrus fruit; and red peppers are supposed to have three times as much. Hot peppers contain even more vitamin C, 357 percent more than an orange. Those are pretty good reasons to eat peppers, huh?
Thursday, April 19, 2007
Planting our Blackberry Bushes
Well, I finally planted our three blackberry bushes yesterday. My daughters and I purchased them from a local nursery the weekend before Easter. That was almost three weeks ago! The weather has just been so cold and yucky that I delayed in planting them. They stayed nice and warm in our garage. We have high windows that let in sunlight and they did just fine. We purchased the black satin thornless variety at the suggestion of the gentleman who helped us at the nursery. I remember picking blackberries as a child and the thorns were never pleasant. Oh, but the blackberries were good! My neighbor had a whole maze of blackberry bushes in her backyard. She would take me out and let me pick to my heart's content. I can't wait for my girls to be able to do the same. We'll have to try out some recipes for jams and jellies too. I better not leave out blackberry pie! These three bushes will make for some good memories.....................if they provide us with ample blackberries and I bet they will. We planted our three blackberry bushes along our back fence where they will get plenty of sunshine. This variety is supposed to grow approximately eight to ten feet wide. Once the stems arch over to the point of touching the ground, additional roots or offspring are generated. Hopefully, we'll have plenty of blackberries to pick next year. Since the blackberries are produced on the previous year's growth, we won't have any to pick this first year. Blackberries have crowns that produce biennial shoots. During the first year of growth the shoots are called primocanes. These primocanes develop flower buds. In the second year the shoots are called floricanes. These floricanes produce flowers that mature into fruit. After fruiting, the floricanes die and should then be removed. Our first harvest will probably start next July or August and extend through September. Frequent picking is best to encourage more fruit production and reduce the risk of rotting which only encourages disease. You should pick every 3 to 6 days using a breaking motion rather than pulling. Also, pick into a shallow container to prevent the berries from crushing. Avoid picking when the berries are wet and refrigerate as soon as possible. I can hardly wait until next year!
Growing Raspberries & Blackberries
Growing Raspberries & Blackberries
By Michael Russell
When planning your patch of brambles (as these fruits are known), pay special attention to air circulation and soil drainage. Taking weed-control precautions before you plant is also important because most brambles sport hooked thorns that make weeding the mature plants difficult and shallow roots that hoes easily damage. Raised beds work well with brambles. Allow at least 8 feet between rows of plants. Don't plant where other brambles or potatoes, tomatoes, or eggplant have grown in recent years due to the risk of Verticillium root disease infection. It's also best to eliminate nearby wild brambles, if possible, because they often spread disease.
Brambles range in growth habit from upright to sprawling - some stand up on their own, but most need trellis supports to keep the fruiting canes off the ground. A typical arrangement consists of a T-shaped post and crosspiece at either end of the row with taut wires or heavy twine running between them down the length of the row. Trailing varieties of blackberry can also be ties to wire fence or other flat support.
Shoots called canes grow from either the roots or crown of the plant. Brambles are biennial, which means that plants flower on second-year canes, which subsequently die. Canes are called primocanes the first year they sprout and floricanes in their second year. Floricanes die after fruiting and should be pruned out. Most raspberries and blackberries produce fruit only on the floricanes, but some raspberry varieties, often referred to as everbearing, also produce on primocanes in the fall.
Depending your personal preference and climate, you can choose from several bramble types and many different varieties for your garden.
Red raspberries: This delicate fruit grows best in cool climates where plants will receive the 800 to 1800 hours of chilling they need to produce fruit. Most varieties bear one crop per year, but others produce two. Summer-bearing varieties produce fruit on floricanes in the summer, everbearing types fruit in the summer on floricanes and again in the fall on primocanes. Although most raspberries produce red fruit, some have yellow or purple fruit.
Black raspberries, black caps: The fruits of this plant have a rich flavor and lack the core that characterizes blackberries. Plants grow new primocanes from the crown instead of the roots and thus are easier to contain within a row because they don't grow shoots several feet from the mother plant as red raspberries do. Plant 3 feet apart in raised beds.
Blackberries: Preferring hot southern summers, blackberries grow in the lower latitudes, though there are varieties adapted to cooler climates. Blackberries fall into two main categories - bush or upright types and trailing. The trailing varieties make less appealing plants for most home gardeners because they require more trellising and maintenance, have more thorns than the uprights and are less cold hardy. Thornless blackberries are now available, under the names 'Arapaho', 'Black Satin', 'Chester', 'Navaho', 'Hull' and 'Triple Crown'.
Michael Russell
Your Independent guide to Gardening
Article Source: http://EzineArticles.com/?expert=Michael_Russellhttp://EzineArticles.com/?Growing-Raspberries-and-Blackberries&id=216946
Sunday, April 15, 2007
Sowing Your Own Seeds
Seed Starting Tips
By Yvonne Cunnington
Starting your own plants from seed is a very satisfying project if you're itching for spring. Growing flowers and vegetables from seed isn't all that difficult if you follow these simple guidelines:
Enjoy browsing and ordering from the seed catalogues and web sites, but don't start your actual sowing too early. It's tempting to get started as soon as seeds arrive, but don't sow too soon or your plants will be leggy and overgrown long before it's safe to transplant them outside. If the seed packet recommends sowing four to six weeks before the last frost date, it's better to go with the four-week, rather than the six-week date.
Another pitfall is sowing more than you need. By all means, sow a little extra to make sure you get enough plants, but thin your seedlings to a manageable number. Many leftover seeds are viable for several years if stored in a dry, cool, dark place.
Always use a sterile seed-starting mixture, available from garden centers. Don't use garden soil, which contains fungi and bacteria that can kill fragile seedlings and do not reuse old potting soil for seed-starting.
Follow directions on the seed packet with regard to light and soil temperature. Some seeds sprout in light, others in darkness. Some seeds do best in warm conditions, so invest in a heat mat for seed starting, or put your seed-starting flat in a warm spot, such as on top of the refrigerator. Most young plants grow best at day-time temperatures between 70 to 75ºF (21 to 24ºC) and night-time temperatures between 55 to 65ºF (13 to 18ºC).
Don't over water new seedlings. Over watering can lead to fungal diseases that kill off tiny new plants. Water sparingly, but frequently.
Give newly sprouted seeds enough light. A bright window will do, but grow lights are better.
When seedlings have two sets of true leaves (the first leaves are called seed leaves or cotyledons), start fertilizing once a week with half-strength liquid plant starter or fish emulsion fertilizer.
Harden off young plants before you plant them out into the garden. Cool-season annuals such as pansies and snapdragons should be hardened off several weeks before tender, heat-loving ones such as impatiens or tomatoes. Set your plants outside in a shady, sheltered spot for at least a week or two before transplanting into the garden. Give them half a day outdoors at first, and gradually leave them out longer, slowly moving them into sunnier and windier areas to get them used to life in the real world.
Yvonne Cunnington is a garden writer and the author of Clueless in the Garden, a guide for beginner gardeners. For more information on seed-starting see http://www.flower-gardening-made-easy.com/Seeds.html and http://www.flower-gardening-made-easy.com/seedlings.html For more gardening tips, visit Yvonne's website at http://www.flower-gardening-made-easy.com.
Article Source: http://EzineArticles.com/?expert=Yvonne_Cunningtonhttp://EzineArticles.com/?Seed-Starting-Tips&id=129271
Thursday, April 12, 2007
Planting Your Easter Lilies!
Easter Lilies, and the Number One Gardening Question Right Now
By Doug Green
Everybody asks about Easter lilies! Can they go outside; can I plant them in my garden? And to this I reply, "Why not?" Like other bulbs, there are two options if you plant your leftover Easter lily bulbs - either they will live and flower for many years (it is perfectly hardy into zone 4) or they will immediately die. If you don't plant the bulb, it will definitely die. So you have nothing to lose by planting.
Once the Easter lily bloom has faded in the house, cut the stem back as far as you can. Grow the plant in a sunny windowsill, keeping it moist (not sopping) and feed weekly with houseplant food. After all danger of frost has passed wherever you live, you can plant it outdoors. Planting outdoors is as easy as digging a hole and planting so that the top of the bulb will be three inches below the surface.
Add a shovel of compost and a shovel of peat moss to the planting hole and ensure the soil is well loosened. Remember it is necessary to dig a large enough hole to spread the lily roots out and to ensure it is at least eighteen inches from another plant. Place the bulb in the bottom of the planting hole and backfill the soil up to the neck of the bulb – do not cover the green leaves. Covering the green leaves at this time could rot them.
Wait until the leaves have turned yellow and faded before totally filling in the hole. After you've planted the bulb, water it thoroughly. Carefully water and turn the area into a mudhole so no air spaces are left around the bulb.The original foliage may die back immediately after planting. If this happens, cut the foliage right back to the bulb and then backfill the hole. Do not be surprised to see a new set of leaves emerge from the hole. Water thoroughly after backfilling.
The key to success with growing Easter lilies is to give the tops full sun but to shade the roots. Hot tops and cold feet would describe this growing condition. Also, excellent drainage is essential for bulb success. Poor drainage or clay soils will rot the bulb over winter because of excessive moisture.
Remember the normal time for the lily to bloom is mid-summer. The first planting year you may see a bloom in mid-summer but the likelihood is that the bulb will wait for next year to bloom again. Your job is to grow the bulb. Do not cut off leaves until they are well faded and quite yellow. Do not pin them up so other plants can grow next to the lily. You want those leaves to stretch out and absorb as much sunlight as possible because they are feeding the bulb and making next year's flower bud.
And next year's Easter lily bulb is what you're looking for, and the one after that, and the one after that too. If you're looking for other bulb information, check out this website. To contact the author, use the email form at http://www.flower-garden-bulbs.com/gardeningtips.html
copright Doug Green 2005
Doug GreenAward winning garden authorhttp://www.flower-garden-bulbs.comBlog:http://www.simplegiftsfarm.com/gardens-gardening-news.html
* * * * * * Permission is given to use or distribute the above article in accordance with ezinearticles.com terms of service
Article Source: http://EzineArticles.com/?expert=Doug_Greenhttp://EzineArticles.com/?Easter-Lilies,-and-the-Number-One-Gardening-Question-Right-Now&id=20631
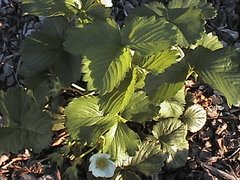
My Strawberries
We planted strawberries around our swimming pool last year and they did fairly well. We planted the day-neutral variety that produces the whole season long. Ours produced from April through early October. They didn't produce quite as many as I thought they would though. Now that I've done a little reading, I realize that I should have snipped the blooms off through the end of June because they were first year plants. This would have helped them to get better established early on and they should have produced more fruit later. What they did produce were very sweet and our labrador ate most of! My goal this weekend is to dig up and replant all of my runners. I'll probably move some of them to my front flower beds. I'm going to attempt to keep track of how old all of my plants are so that I can replace them every three to four years which is supposed to be the end of their producing life cycle. I guess if I lose track I can just dig them up once they stop producing! We'll see what happens.
Subscribe to:
Posts (Atom)